Running successful WordPress websites has taught me an important lesson: language shouldn’t be a barrier to reaching your audience.
I learned this firsthand when we started translating our WPBeginner guides into Portuguese, German, Italian, and Japanese, and saw our readership grow dramatically.
The good news is that automatic translation technology has come a long way. You no longer need to hire expensive translators or spend weeks manually translating your content. There are now powerful tools that can do this automatically while maintaining good quality.
In this guide, I’ll walk you through the best methods I’ve discovered for automatically translating your WordPress site. These solutions, which I’ve personally tested and verified, are perfect for anyone looking to expand their reach to a global audience.
Why Translate Your WordPress Site?
Translating your WordPress site is a smart way to reach more people worldwide. Visitors will feel more welcome and understood when your site is in the language they understand.
That’s exactly what happened when my team and I translated WPBeginner into more than six languages. We started receiving a lot more traffic from people all over the world.
When your content is available in multiple languages, you offer a more personal and engaging experience. Visitors can quickly find what they need, and there’s a good chance they’ll stick around longer and come back again.
Plus, having a multilingual website can have some SEO benefits. Your content may rank higher when users are searching in different languages, such as a translated French blog post for users searching in French.
In short, translating your site helps you reach more people, offer a better experience, and show you care about all your visitors.
When to Automatically Translate Your WordPress Site
I’ve found automatic translation to be a lifesaver when I need to translate large chunks of content quickly, and hiring professional translators isn’t feasible. It works wonders for content that changes often, like blog posts or product listings.
In my experience, here are the types of websites that benefit the most from automatic translation:
- Blogs and news sites. These websites constantly update their content. Automatic translation is perfect for keeping readers informed in their preferred language without delay.
- eCommerce websites. Products change frequently, often requiring updates to descriptions. Automated translation helps reach a global audience quickly so that customers can understand product details right away.
- Community and forum sites: Engaging users from diverse backgrounds becomes easier. When discussions and resources are available in multiple languages, it encourages more participation.
📝 While automatic translation is super convenient, it’s not the best fit for everything.
Professional translation is often the best option for content like legal pages, technical instructions, or anything that captures your brand’s unique voice. It ensures the accuracy and clarity that automated tools might miss.
Now, let’s explore how you can seamlessly translate your WordPress content using the best WordPress translation plugins.
In this article, I will cover two ways to translate your site, and you can use the jump links to go to the method you want to use:
Method 1: Automatically Translate Your WordPress Site Using Weglot (Easiest)
Of all the WordPress multilingual plugins I’ve experimented with, Weglot really stands out for its automatic translation feature.
It uses powerful machine translation from leading providers like Microsoft, DeepL, and Google Translate to give you a fully translated and displayed website in minutes.
With Weglot, you don’t have to worry about manually translating any new content you add to your website. The plugin automatically detects when new pages or posts are published and instantly translates them into your selected target languages.
Weglot offers flexible pricing options, starting with a free plan that translates up to 2,000 words into one language. You can also use our Weglot coupon code for 15% off.
Now, let me show you how to automatically translate your WordPress website with Weglot.
Step 1. Create and Set Up Your Weglot Account
To get started, you need to visit the Weglot website and create a new account.
Simply enter your email address and password, then click on ‘Sign up’ to complete the registration.
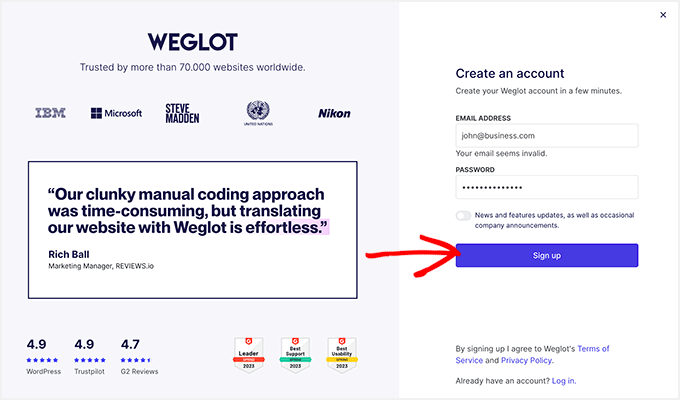
After signing up for an account, you’ll go through the setup process. Start by adding your role – this just helps Weglot tailor the experience.
Next up, select which website you want to translate. Is it your company’s, a client’s, or your personal site?

Simply continue the rest of the setup process. Once this is done, let’s start configuring the plugin in the next step.
Step 2: Install and Configure the Weglot Plugin
Now, you’ll land on the ‘Projects’ page.
First, you need to enter a name for your new translation project. The name can be anything you want, like the title of your website.
You’ll also need to select your website builder. In the ‘Website Technology’ field, pick ‘WordPress’ from the dropdown menu.

Now, click ‘Next’ to continue.
The next page gives step-by-step instructions for installing and activating the Weglot plugin on your WordPress site.
If you need help installing the plugin, just check out our handy guide on how to install a WordPress plugin.
Don’t forget to copy the API key displayed on the screen.

After installing and activating the plugin, click on the Weglot menu item in your WordPress dashboard. This will take you to the plugin’s main configuration area.
Here, you’ll need to paste your API key into the ‘API Key’ field.
Once your API key is verified, you can select the languages you want to translate your site into.
Just click on the dropdown under ‘Destination languages’ and select the languages from the list.

Weglot supports over 110 languages, so feel free to select as many as your plan allows.
Remember to hit ‘Save Changes’ after choosing your destination language.
Weglot will now work its magic and translate your website. In just a moment, you should see a success message that reads: “Well done! Your website is now multilingual.”

Want to see your translation in action? Click the ‘Go on my front page’ button to check out your newly translated site.
Then, scroll down to the dropdown menu at the bottom-right corner of your screen.
Weglot has now added a language-switching button to your website. Your visitors can use this button to instantly translate all of your content from its original language to any new language you’ve set up.

And just like that, your WordPress site has been automatically translated!
You can also manually edit your translations directly from the Weglot dashboard.
To do this, go to your Weglot account, then to Translations » Languages. Next, click the pencil icon.

This will open the Language Summary page, where you can start editing your translations.
Simply replace the old translation with the new one by typing into the correct field. In my example, it’s the French field.

Once you’ve edited the translation, Weglot will automatically update and save the new version.
Then, on the top right of your page, you’ll see a message indicating that the edited translation has been successful.

If needed, simply repeat the steps to edit any translation you want.
Method 2: Automatically Translate Your WordPress Site Using WPML
WPML is another powerful multilingual plugin with automatic translation. It has multiple automatic translation engines, is easy to use, and can quickly translate your content. Compared to Weglot, it also offers more control over your website translations.
One thing to note is that this plugin is paid, and the automatic translation feature is only available in the higher-tier plans.
Other than that, you will need credits to use any of the automatic translation engines, which can be pre-paid or paid as you use them.
That being said, the automatic translation engines include Microsoft Azure, Google Translate, DeepL Translate, and WPML’s own AI, which are all known for their accuracy and reliability. For more information, check out our WPML review.
Personally, I think WPML is worth every penny, especially if you manage a lot of content or run a constantly updating multilingual site.
Ready to dive in? Let’s set things up!
Step 1: Install and Set Up the WPML Plugins
First, go to the WPML website and click ‘Buy and Download.’

You’re now on their pricing page.
Here, make sure to pick either Multilingual CMS or Multilingual Agency, as that’s where the automatic translation feature is available.

After that, simply complete your payment and create an account.
Then, you need to log in to your new WPML account and open the ‘Downloads’ page. You can do this by clicking on your username in the top right corner and selecting ‘Downloads.’
You should see a section that says ‘Quick and Easy Installation.’ Go ahead and click the ‘Download’ button to download the OTGS Installer plugin.
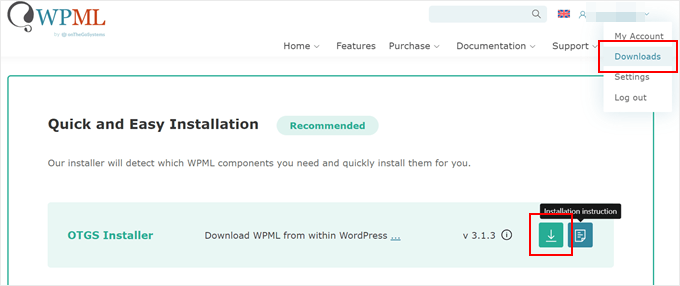
Once downloaded, log in to your WordPress dashboard.
Here, go to Plugins » Add New Plugin. Then, click on ‘Upload Plugin’ and select the zip file that you just downloaded.
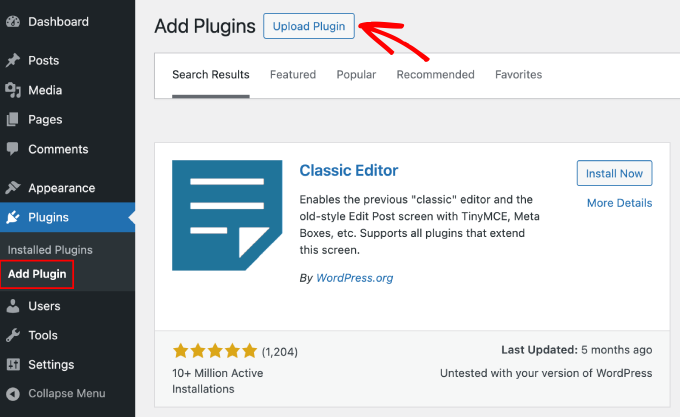
After that, simply activate the plugin to continue.
If you need help, check out our guide on how to install a WordPress plugin.
Step 2. Add a New Site Key
The WPML plugin has a site key specific to each website. This site key allows you to receive automatic updates from WPML.
After activating the plugin, go to OTGS Installer » Commercial. Next, click the ‘Register WPML’ button.

At this point, you need to enter your site key.
You can do this by clicking the ‘Get a key for this site’ link.

You will now get redirected to your account page on the WPML website.
First, choose whether you’re creating a production site (a live website) or a development site. Once you’ve made your choice, click ‘Continue.’

Next, go ahead and assign some automatic translation credits to your WPML plugin. If you don’t have any, you can purchase some credits here.
Once you have assigned the credits, simply click ‘Continue.’
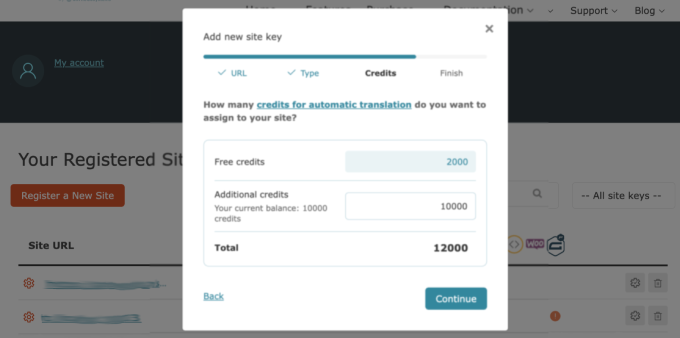
You should now see your newly generated site key.
Go ahead and copy this key, and switch back to your WordPress admin dashboard.

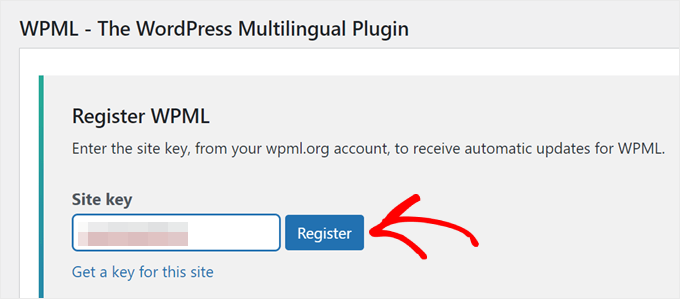
You need to paste your site key in the ‘Site key’ field.
Then, click on the ‘Register’ button to continue.
Once you register successfully, you should see a list of WPML plugins you can install. For this tutorial, I’ll choose the ‘WPML Multilingual CMS’ and ‘String Translation’ plugins.
Below, just tick the ‘Activate after download’ checkbox next to the plugin(s) you want to install and click the ‘Download’ button.
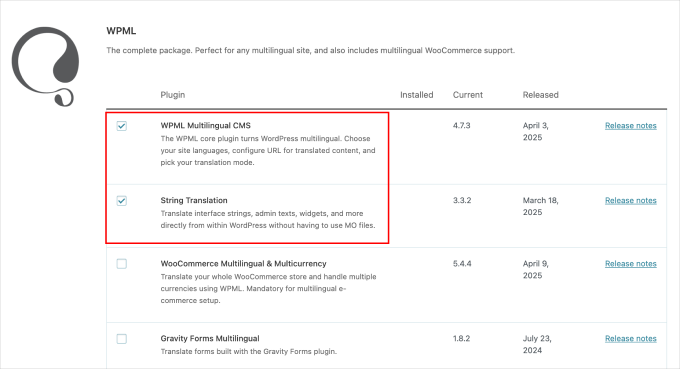
Your WPML translation plugins should be active now. To set up automatic translation, just continue to the next step.
Step 3. Configure Your WPML Plugin
Now that the WPML plugins are active on your website, you will be redirected to the WPML setup wizard.
First, you need to select your site’s default and translation languages.
For this tutorial, I chose ‘English’ as my default language and ‘Malay’ as my translation language. You can choose more than one translation language if needed.

Once that’s done, click ‘Continue.’
Next, let’s choose the URL format of the translated versions of your content. You can choose between:
- A directory for each language. So, for Malay, an example would be example.com/ms.
- A different domain per language. An example would be example.ms for Malay.
- The language name is added as a parameter, like example.com/?lang=ms.
I decided to go with the first option, as it’s pretty simple and we don’t need to purchase a new domain name with a different domain extension.
It’s also the format we use here at WPBeginner (for example, we use wpbeginner.com/de/ for our German content).
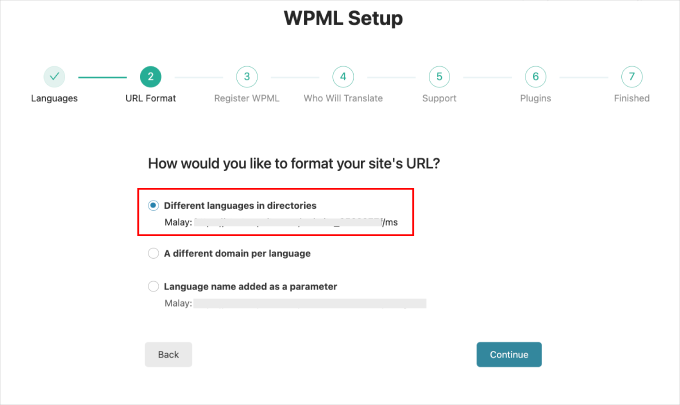
Once done, click ‘Continue.’
Next, you need to add your site key again. Copy the one you generated earlier and enter it here.

Click ‘Continue’ to proceed.
The next step is choosing who will translate the content.
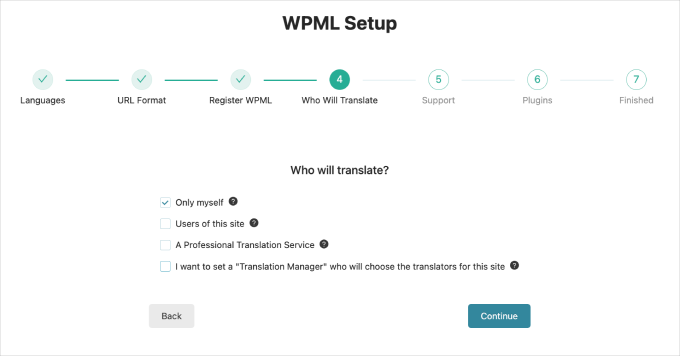
As you see, the options here are:
- Only myself. This means you’re the sole translator of the website.
- Users of this site. You can assign other users to translate the content. This is perfect if you run a content team with editors or translators.
- A Professional Translation Service. This option requires you to integrate your website with WPML’s list of third-party translation services.
- Set a Translation Manager. This option allows you to choose a site user to be the Translation Manager, which is perfect when you’re translating a client’s website.
For demonstration purposes, I chose the first option. In addition to giving me the most control, this option also works well with the review process, which I’ll go over in Step 5.
Click ‘Continue’ once you’ve made your choices.
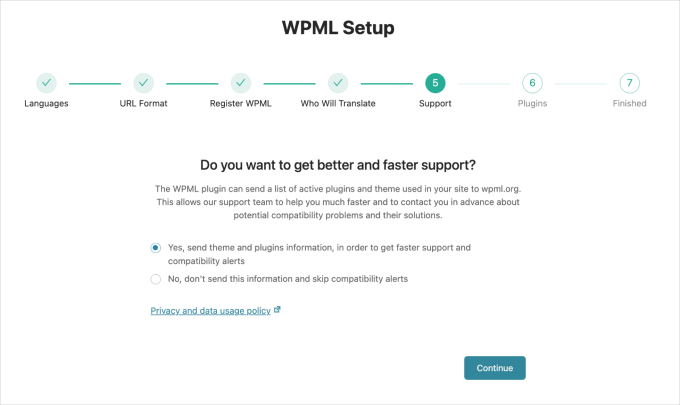
The next step is choosing the support option.
You can opt to send WPML your plugin and theme information so that they can access data for any potential compatibility issues that may come up.
You can also skip this step and just hit the ‘Continue’ button.
Next, choose your plugins. These plugins are recommended automatically based on your website’s themes and existing plugins.
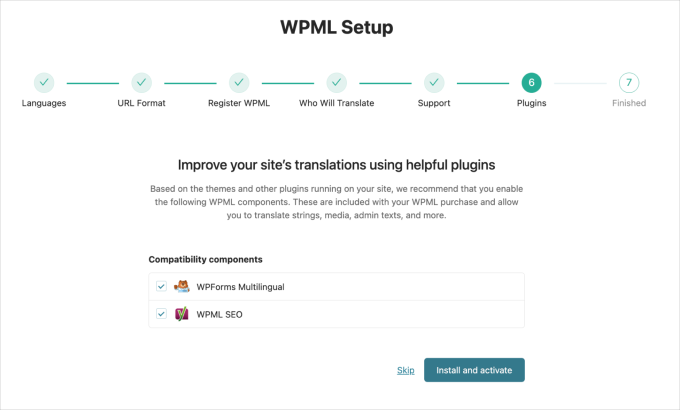
Feel free to install the plugins or skip this step.
Once you’re at the final ‘Finished’ page, click ‘Go to Translation Dashboard.’

This takes you one step closer to translating your content.
Step 4. Configure Your Automatic Translation Engine
Before translating your content, I recommend configuring the automatic translation engine. This will help you get a more accurate translation.
On your WordPress dashboard, go to WPML » Translation Management. Then, choose the Translation Tools tab.

Then, scroll down to the ‘Automatic translation engines’ tab.
Click it to open the translation engine options.
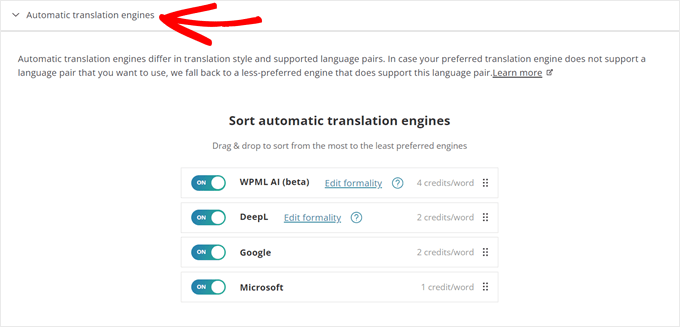
You should now see all the automatic translation engines used by WPML: WPML AI, DeepL, Google Translate, and Microsoft Azure.
Let me explain them one by one:
- WPML AI is the plugin’s translation engine. It integrates DeepL and Google translation technologies for a much better translation. It costs 4 credits per word.
- DeepL is considered very accurate and natural-sounding for a translation engine. I prefer using this to Google and Microsoft, and it costs 2 credits per word.
- Microsoft and Google translate content accurately but struggle with context or nuance. Google costs 2 credits per word, while Microsoft costs 1 credit per word.
In this tab, you can sort the translation engines from the most to the least prioritized. You can also enable or disable certain engines to save even more credits if needed.
Step 5. Translate Your Content
Once you’ve set up your preferred automatic translation engine, you’re now ready to translate your content.
Go to WPML » Translation Dashboard, and you’ll see the option to enable the automatic translation, marked as ‘Translate Everything Automatically.’
Before you can turn it on, you must first add some content to translate. Simply scroll down and tick the box next to one of the posts you want to translate.
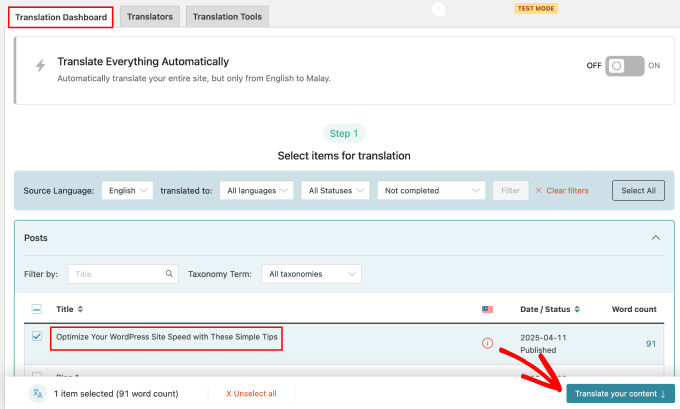
Click the ‘Translate your content’ button once you’ve picked. For this article, I’m translating a short article.
This will take you to the next step, where you can set up the translation methods. You can choose to translate the content yourself or automatically.
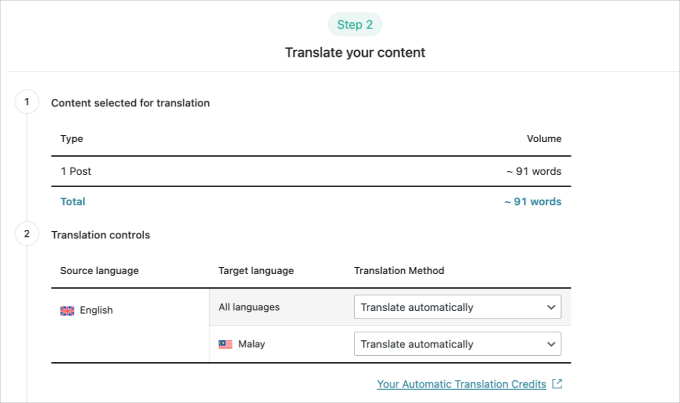
Scrolling down, you’ll see the option for what you want WPML to do after translating your content. There are three options:
- Wait for review. This allows you to review the translations before publishing them. I recommend this option to check the translated content for errors.
- Publish and mark for review. This option allows WPML to publish the content and mark it for you to review later.
- Publish without review. This option publishes the recently translated content without a review process.

I’ll choose the’ Wait for review’ option since I want to show you this translation plugin’s review feature.
Next, turn on the automatic translation feature.
Simply toggle on the option, ‘Translate everything automatically from now on, without asking me.’

After turning it on, click the ‘Translate’ button.
This will open the option below. There are two options: translate your entire site or translate only future content.

I recommend choosing the “Translate my entire site” option since WPML will translate both your current and future content.
Click ‘Save settings,’ then the plugin will start the translation process.
Once done, you’ll see the ‘Sent for translation’ notification. Go to WPML » Translations to proceed.

In the next step, I’ll show you the reviewing process for your translated content.
Step 6. Review and Publish Your Translated Content
Continuing from the previous step, you’ll be taken to the ‘Translations queue’ page. To review the content, just click the ‘Translate’ button.

After a few seconds, you’ll be directed to the content editing page.
Here, you can review the translated content and adjust accordingly. The left side shows your original content in the default language, while the right displays your translated content.

To start editing, click on any of the text snippets on the right side of the page.
Once you click on the text snippets, you’ll see a toolbar on the right side. Choose the ‘Translate this text automatically’ option as shown in the screenshot below.

If needed, you can also have the plugin re-translate the text automatically.
Once you’re satisfied with the translation, click the ‘Complete Translation’ button.
I highly recommend reading your translated content again to make sure everything looks good. If you’re not a native speaker of this language, I suggest getting a second or third opinion from someone who does speak it.
To view the translated content, go to one of the posts you’ve chosen earlier, then hover over the title.

Click the ‘View’ button to open the post.
At first, you’ll see the original language.

To see the translated version, scroll down until you find WPML’s language switcher in the footer section.
Then, go ahead and click the translation language.
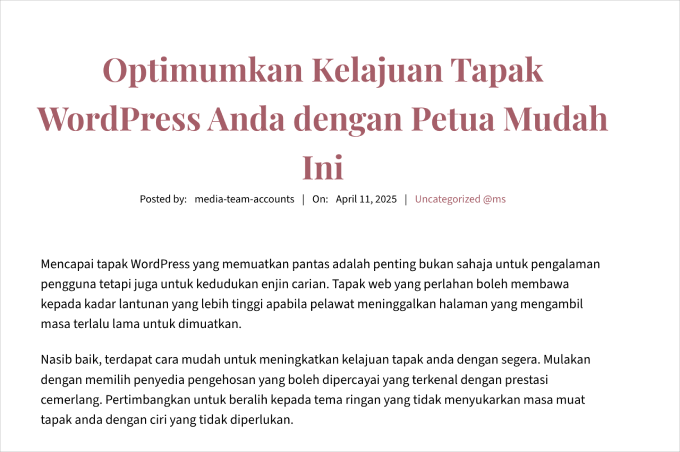
You should then see an identical version of your site with all your translated content.
If you use the directory URL format, you’ll notice that the site uses a language subdirectory.

And that’s it! If you want more information, you can check out our guide on how to easily create a multilingual WordPress site with WPML.
Alternative Tools: Use SeedProd’s AI Content Generator to Translate Your Landing Pages
If you’re looking for another way to translate specific pages on your WordPress site, I recommend going with SeedProd.
As one of the popular page builders for WordPress, SeedProd includes an AI assistant feature that can translate content into over 50 languages. Check out my full SeedProd review to learn more.
The AI assistant is handy for translating WooCommerce product descriptions, landing pages, or specific sections of your WordPress website or online store.
To use it, you need to install and activate SeedProd and create a new landing page. Check out our guide on how to create a landing page to learn more.
Once you’re in the page editor, you can click on any text in the SeedProd editor. Then, click ‘Edit with AI’ in the left sidebar.
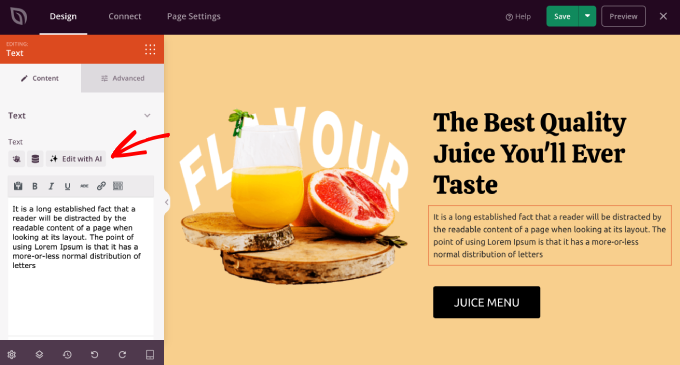
The AI Assistant will now appear.
After that, you can choose one of the languages to translate the text into.

Once you have chosen one of the languages, you can keep optimizing the text by making it simpler, longer, or shorter and even changing the tone.
When you’re happy with how it looks, simply click ‘Insert’ to add the translated version.

For more information about using AI in this way, you may wish to see our guide on how to use AI to boost your marketing.
FAQs About Automatic WordPress Translation
Looking to learn more? Here are some frequently asked questions related to automatic WordPress translation.
How do I automatically translate a website?
If your site is built with WordPress, you can use plugins or services to simplify translating it into different languages.
Tools like Weglot and WPML can help you translate your content quickly and easily. For more options, see our pick of the best WordPress translation plugins.
What is free automatic translation for WordPress?
Free automatic translation for WordPress comes through plugins or services that offer free plans or use free translation services like Google Translate. These allow translation without upfront costs, although they might limit languages or the number of translations each month.
Plugins like Weglot offer a free version with basic translation features, making them a practical choice for managing smaller websites.
Can you translate a WordPress site without a plugin?
Yes, you can, but it will take a lot of time. You’d have to make separate versions of your site for each language, translate every page, and post yourself. This is hard work and needs more technical skills, which can be tough for most multilingual website owners.
Learn More Multilingual WordPress Tips and Tricks
If you want, check out these tips and tricks to launch a multilingual WordPress site:
- How to Easily Create a Multilingual WordPress Site
- How to Add Multilingual Search in WordPress
- How to Find and Translate a Translation-Ready WordPress Theme
- Best RTL WordPress Themes (Right to Left Language Support)
- How to Easily Create a Multilingual Sitemap in WordPress
I hope this article has helped you learn how to automatically translate WordPress. You may also want to check out our guide on how to translate a WordPress plugin in your language and our expert picks of the best multi-currency WordPress plugins.
If you liked this article, then please subscribe to our YouTube Channel for WordPress video tutorials. You can also find us on Twitter and Facebook.


Vegard O.
With this method, it would seem you must always initiate the translation operation manually. Isn’t there a way to make this automatic?
WPBeginner Support
We do not have a recommended method at the moment as the plugin expects you to double-check the translations.
Admin
Amir
This is Amir from WPML team. The next release of WPML (version 4.5) will allow you to translate the entire content of the site automatically without having to manually send pages for translation. To ensure good quality, the default would be for you to review the translations before publishing them.
We’re preparing a beta version very soon and the production version is scheduled for the summer.
WPBeginner Support
We hope our article helps simplify the process for you
Admin
Romel Bezerra
It seems to be very good. I will try to test it as soon as possible.